Run Streamlabs Frst Time Setup Again
Note: Roland now has a free solution for Windows to simplify your alive streaming workflow, more details are available hither: Roland Live Streamer: How to Gear up and Apply this Gratuitous Software to Stream
While OBS has more than customization settings, if you are looking to simply stream your VR mixer or UVC-01 USB output to Facebook or YouTube, with minimal setup, consider starting with Roland Live Streamer.
This guide covers alive stream setups using a VR Series AV Mixer and the complimentary OBS Studio software, allowing y'all to customize your live stream settings.
Annotation: If you have a V series switcher and a UVC-01 (or tertiary party USB Capture Device that converts HDMI or SDI to USB), the same concepts apply.
The guide is divided into chapters, and below is a tabular array of contents in case you need to jump to a section again for reference.
Note: Streaming platforms occasionally change their user interface on their website, so some of the images in this guide for Facebook, YouTube, and Restream.io may announced slightly dissimilar, but all the key steps are here to guide you through setup.
If this is your first time setting up OBS, definitely read all the chapters in order. Information technology should take well-nigh 30-60 minutes to set up and examination your stream for the first time.
Before you brainstorm, fix a wired internet connection for the figurer running OBS. Wireless connections not recommended for streaming, as fifty-fifty a fast connexion tin can fluctuate in speed.
Note: If WiFi is your merely pick, a router with wireless Air-conditioning or faster is recommended, as well as a estimator that supports wireless Ac.
Table of Contents:
Introduction
Getting Started
Stream Quality Settings
Record Quality Settings
Adding Sources
Sound Mixer Setup
Add a Logo in OBS
RTMP Stream Settings
Connect to Facebook
Connect to YouTube
Connect to Restream.io
More than Information
Introduction:
-
The VR series of AV Mixers have a USB 3.0 output that carries audio and video. Simply connect a USB 3.0 Super Speed cable between your AV Mixer and computer, and then use a web browser to stream your program output.
- Note: The Roland UVC-01 volition convert any video switcher'due south video and audio to USB also.
-
For more control over your stream, you can also connect free software like OBS Studio (Open Broadcaster Software), a popular solution for gamers and podcasters, similar to Wirecast.
- Note: Streamlabs OBS is another skillful selection, with some boosted enhancements and features. While this guide does not cover Streamlabs OBS, a lot of the same concepts and settings apply.
-
Adding OBS to your video workflow lets you customize your stream settings, including the ability to stream to multiple platforms with a third-political party multi-stream service.
| Stream Directly Through Web Browser | Stream Indirectly |
| - Easiest Method | - Advanced Method |
| - Quality Settings are Automatic | - Quality Settings tin be Adapted |
| Practiced for: Communications, Interviews, Videoconferencing | Good for: Live Music, Sports, Worship |
-
This guide covers setting up OBS for streaming to Facebook Live and YouTube Live.
-
Hither are noesis base of operations articles to help set up and troubleshoot the USB output on the VR series. Use them to prepare up the USB output resolution and frame rate for your VR Serial switcher.
-
VR-1HD: Troubleshooting USB Video and Sound Output
-
VR-4HD: Troubleshooting USB Video and Audio Output
-
VR-50HD: Troubleshooting USB Video and Audio Output [MK I & II]
-
-
NOTE: The best general USB output resolution and frame rate depends on how fast your computer is, especially if you desire to stream and record at the aforementioned fourth dimension.
- Most computers can handle 1080P 29.97 without upshot. This provides you a high resolution image with reasonably fluid move.
- Fast computers with a 6 or 8 cadre processer and a dedicated GPU can safely handle 1080P 59.94 without outcome. If streaming and recording at the aforementioned fourth dimension, it's recommended to take the CPU stream and GPU record if supported past your graphics configuration, more than on that afterwards.
-
VR Series Mixers back up multiple video formats for the USB video output:
| 480P 29.97 | 480P 59.94 | 720P 29.97 | 720P 59.94 | 1080P 29.97 | 1080P | |
| VR-1HD | | | | | | |
| VR-4HD | | | ||||
| VR-50HD MK I & Two | | | | | | |
back to table of contents
Getting Started:
-
To start, download and install the complimentaryOBS Studiosoftware on your reckoner.
OBS Studio (Win & Mac): obsproject.com
-
Once you open the software, you will meet this interface:
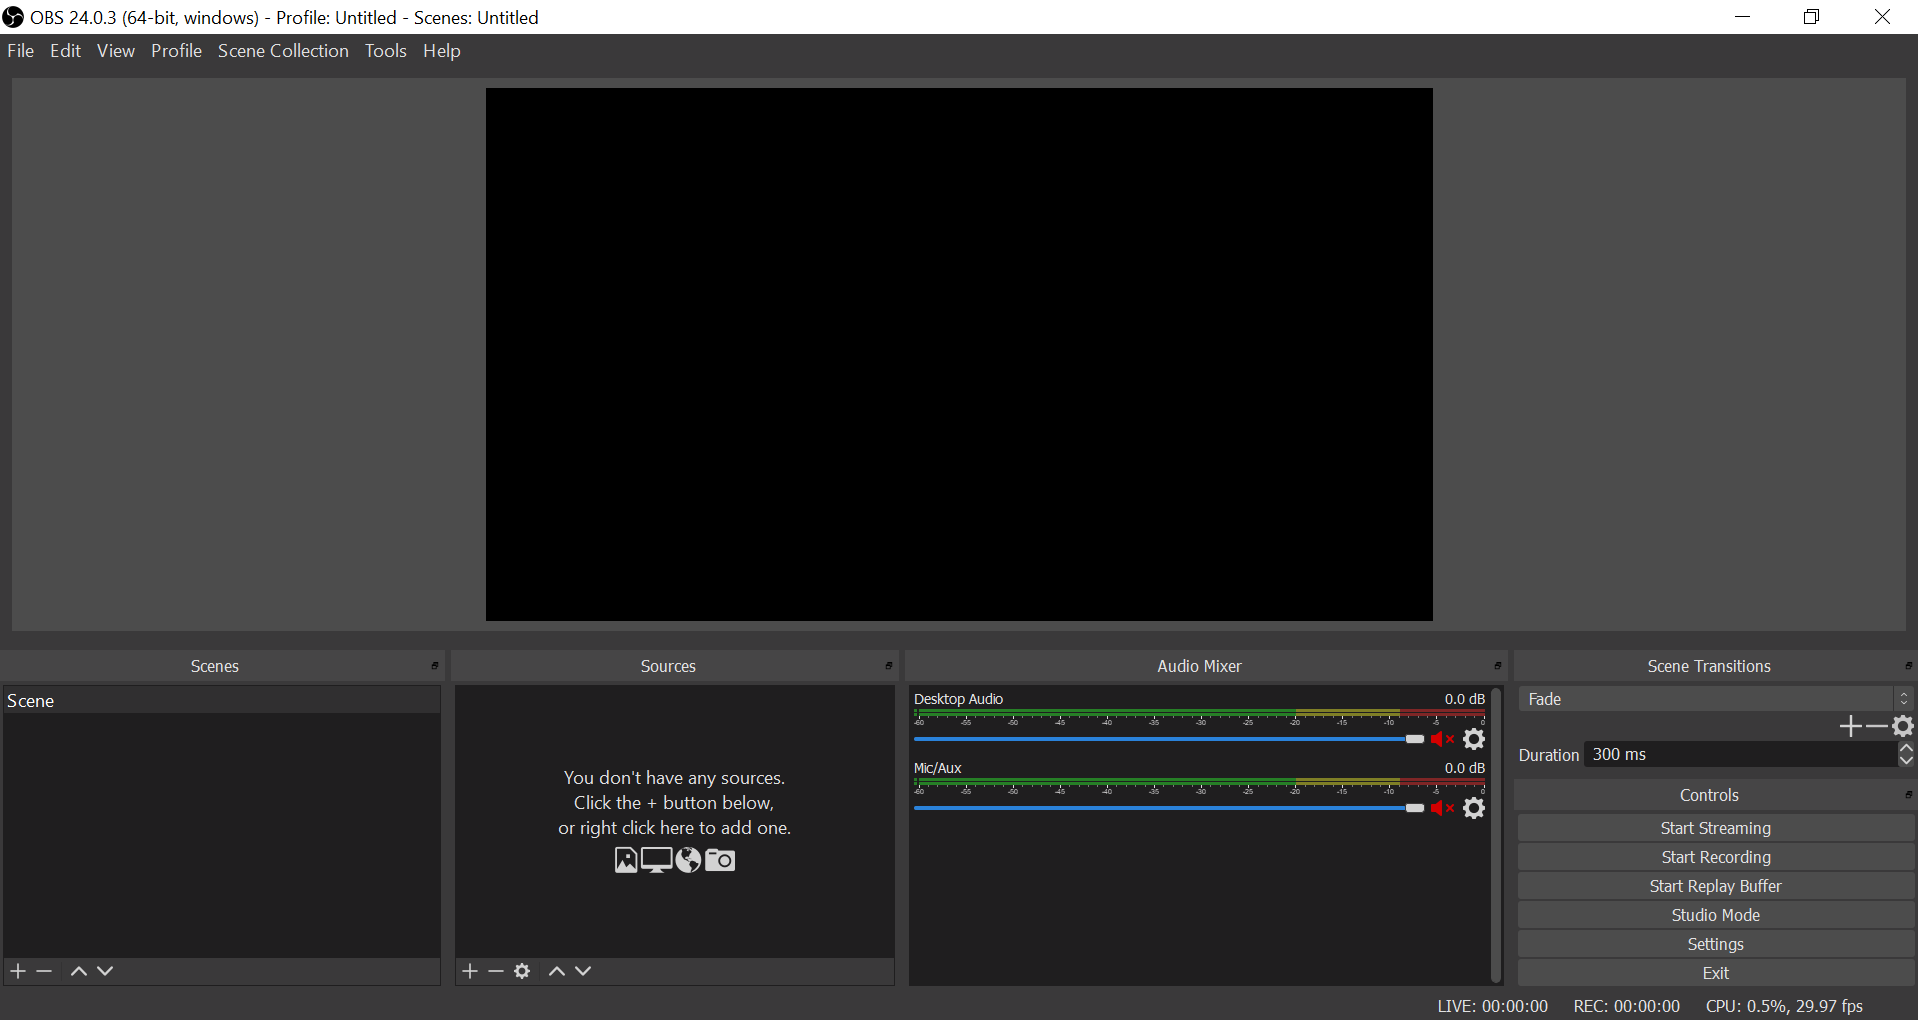
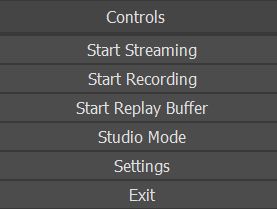
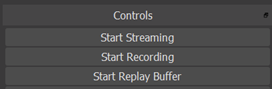
- In the lower-right section underControls, click onSettings.
- In the window that pops upwards, chooseVideofrom the choices forth the left sidebar.
-
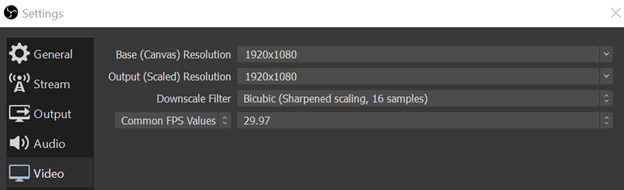
This is where you setup your resolution (video size) and frame rate (smoothness).
-
If your VR Mixer'southward USB output video format is fix to:
- 1080P 29.97 (VR-1HD, VR-4HD, VR-50HD, UVC-01)
- Set theBase of operations (Canvas) ResolutionandOutput (Scaled) Resolution to 1920x1080
- Ready the Mutual FPS Values to 29.97
- 1080P 59.94 (VR-50HD, UVC-01)
- Set theBase (Canvass) ResolutionandOutput (Scaled) Resolution to 1920x1080
- Prepare the Common FPS Values to 59.94
- 720P 29.97 (VR-1HD, VR-4HD, VR-50HD, UVC-01)
- Ready theBase (Canvas) ResolutionandOutput (Scaled) Resolution to 1280x720
- Ready the Common FPS Values to 29.97
- 720P 59.94 (VR-1HD, VR-50HD, UVC-01)
- Set theBase (Sheet) ResolutionandOutput (Scaled) Resolution to 1280x720
- Set the Common FPS Values to 59.94
- 1080P 29.97 (VR-1HD, VR-4HD, VR-50HD, UVC-01)
NOTE: Again, the best general USB output resolution and frame charge per unit is1080P 29.97 for streaming and recording in OBS.59.94 video requires a fast reckoner or defended hardware encoding. More on that later. If yous need 59.94 FPS on a slower figurer, endeavour 720P 59.94.
-
You tin can also use OBS to scale the video to a unlike resolution, only it will require additional processing power from your reckoner.
-
Case: Your VR Series AV Mixer outputs 1080P via USB, and in OBS you record at 1080P, but stream at720P in OBS to optimize your bandwidth.
-
-
Y'all can then adjust theFPS value in this carte du jour to friction match the output of your AV Mixer, if necessary.
- NOTE: Not all streaming platforms back up 1080P 59.94 video. For case, if streaming to LinkedIn, prepare theMutual FPS Values to 29.97, even if your USB betoken is 59.94.
- If yous try to stream 59.94, it might decline the stream, and if you are using a multi-stream platform like Restream.io, it will be too late to cease everything and alter settings.
- If you overload your estimator's software encoder with a high frame rate, yous may experience freezing in your stream or record.
- NOTE: Not all streaming platforms back up 1080P 59.94 video. For case, if streaming to LinkedIn, prepare theMutual FPS Values to 29.97, even if your USB betoken is 59.94.
-
Yous tin monitor CPU usage using the stats in the lesser-right corner of the main window.
![]()
-
Your CPU usage will increase while OBS is streaming and or recording, so even with a fast computer, consider endmost as many programs every bit possible.
-
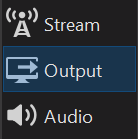
Next, click on theOutputsection of theSettingsbill of fare.
- Earlier yous adjust the settings, click on theOutput Modedrop-down carte at the superlative, and modify the setting fromSimpletoAdvanced.
![]()
-
Just below that, yous will run across tabs forStreaming output, andRecording output.
-
Click on theStreaming tab.
![]()
- You will run into a list of options to adjust the quality of your stream.
Stream Quality Settings:
-
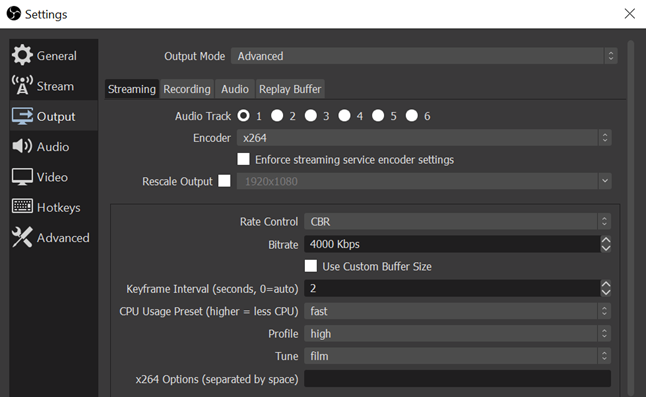
Under the StreamingOutput settings, review and change the following settings:
-
Audio Track: 1 - Go on this every bit i. This counts equally a stereo audio output. You lot tin simply stream one of your OBS Tracks at a time, just you lot can record multiple Tracks.
-
This can be disruptive. Tracks in OBS are stereo audio outputs that take ane or more audio Sources mixed and routed to them.
-
-
Encoder: x264 - Only change this setting if you experience performance issues after configuring everything else.
-
NOTE: This will utilize more CPU power than the other encoding options, and so it may assistance to explore other available options. This guide does not accept recommended settings for the alternate options, so y'all volition have to exam dissimilar combinations of settings to become good results.
- If CPU supports it, you can also try Intel QuickSync or Apple tree VT H264 for dedicated hardware encoding.
- If you have a "discrete" GPU in your computer, like a NVIDIA carte, yous tin use theirNVENC encoder, this volition likely allow you to balance the load between your CPU and GPU and improve your quality.
-
-
Rescale Output: Off - Leave this turned off unless yous desire to record 1080P and stream 720P. Note that this volition increase CPU usage.
-
Rate Control: CBR - Exercise not select VBR, it may lead to quality issues, depending on your content.
-
Bitrate: Varies - This is probably the most of import setting for your stream quality. The higher the number, the better the quality. But if your internet upload speed is not fast enough, OBS will drib video frames, and your stream will skip a lot, and lose sound sync.
-
You can adjust this setting alive, so once you start streaming, you tin reduce the value, if needed. You will notice the status bar in the lower-right corner of OBS adds information while streaming: Dropped Frames, a Green/Yellowish/Red stream health icon, and the current combined sound and video flake-rate in Kbps.
-

- Recommended Bit-Rates: Facebook - 3000-4000 Kbps, YouTube - 4000-6000 Kbps
- If your connection is not fast enough, try a lower value.
- Kbps is Kilobits per 2nd, and not KBps or Kilobytes.
- Mbps is Megabits per second, and not MBps or Megabytes.
- 8 kilobits make a kilobyte, and a megabyte is 1000 kilobytes, or 8000 kilobits.
- This is an important difference. You may hear people say they have an upload speed of 12 Megabytes on their internet connexion, but they actually mean Megabits.
- If you stream for 60 minutes at 4 Megabits per second, you volition upload roughly ane.8 Gigabytes.
- If you plan to stream with a chip-rate of 4000 kbps, you should have a 10 Megabit or higher upload speed on a dedicated network to exist safety.
- Run a speed test online and carve up your resulting upload speed past ii.5, this should be your bit-charge per unit in OBS.
- For example, if you have a 20 Mbps upload speed, you tin safely fix the scrap-rate to 8000 Kbps.
-
Keyframe Interval: two - Both YouTube and Facebook recommend this. Keyframes are full frames of video in the pinch scheme. They are as well known equally I-frames.
-
CPU Usage: Varies - If you have a powerful computer, you tin can choose a slower speed to improve encode quality. The default isFast. Consider using that orVery Fast.
- The departure in quality is less noticeable than the difference in CPU load, as is shown in this comparison video.
-
Profile: High - Recommended over Main Profile.
-
Tune: None- Yous tin choose Motion-picture show, which is optimized for cameras and general apply, but the difference may non be noticeable. There is tooZerolatency, which may assistance with audition interaction during streaming, just information technology tin can negatively bear on the video quality.
-
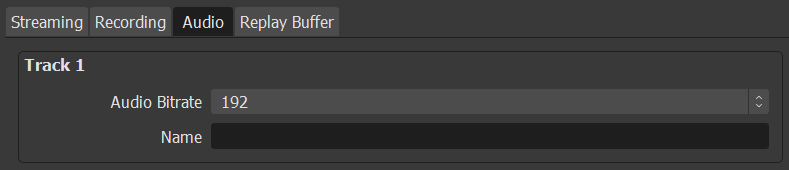
Next, click on theAudio tab, and adjust the sound chip-charge per unit for track ane.
-
Yous can leave it at the default setting of 160 kbps, but if y'all are streaming music in stereo, consider increasing the bit-rate to 192 or 256.
-
back to table of contents
Tape Quality Settings:
-
OBS too supports recording at the same fourth dimension to your hard drive. You can access these settings by clicking on the Tape tab.
- Yous will meet similar settings to theStreaming tab.
-
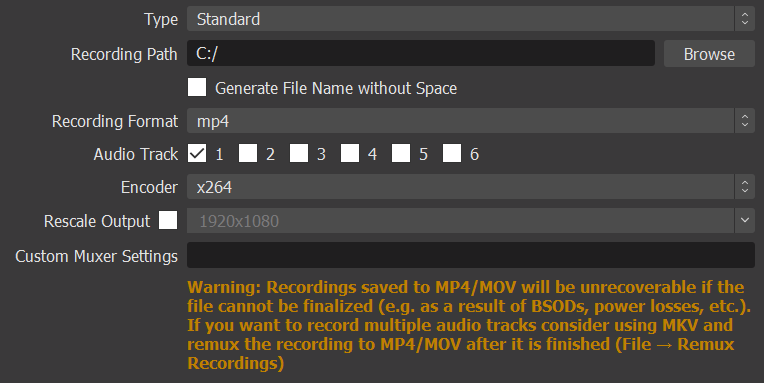
Under the Recording Output settings, review and change the following settings:
- Recording Format: mp4 - Leaving this as .MP4 is the easiest way to get a playable file, but note if the software crashes, y'all may lose the entire recording, simply it speeds up your workflow by eliminating the need to transcode the recording.
-
Audio Runway: i - Keep this as i. More info in the previous Stream settings section.
-
Encoder: x264 - Merely alter this setting if you lot experience serious operation bug later on configuring everything else.
-
-
NOTE: This will utilise more CPU power than the other encoding options, then it may aid to explore other available options. This guide does not take recommended settings for the alternate options, so you volition take to test different combinations of settings to go practiced results.
- If CPU supports it, you can besides try Intel QuickSync or Apple VT H264 for dedicated hardware encoding.
- If y'all accept a "discrete" GPU in your computer, like a NVIDIA carte du jour, you can use theirNVENC encoder, this will likely allow you to residuum the load between your CPU and GPU and meliorate your quality.
-
-
Y'all tin also fix this to(Utilize Stream Encoder), which copies the Streaming settings and uses them for Recording.
-
If your computer is fast plenty, I recommend having separate Streaming and Recording settings, that fashion you can record at a higher quality than the stream.
-
-
Rescale Output: Off - Go out this turned off unless you want to record and stream at different resolutions. Note that this will increment CPU usage.
-
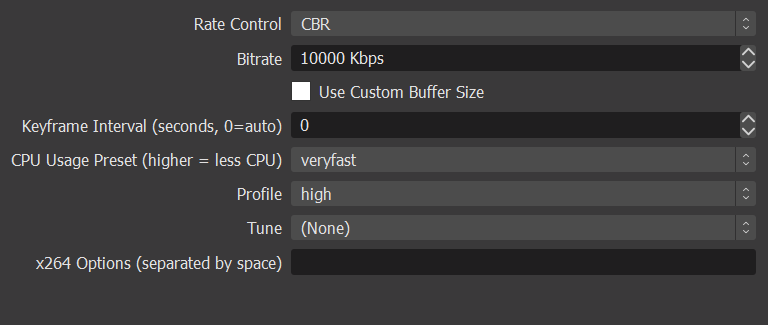
Charge per unit Control: CBR - Do not select VBR, it may pb to quality problems, depending on your content.
-
Bitrate: Varies - This is probably the most important setting for your tape quality. The higher the number, the ameliorate the quality. Just if your figurer is not fast enough, or it doesn't accept an accelerated GPU, OBS volition drop video frames, your recording will skip a lot, and perhaps lose sound sync.
-
Keyframe Interval: 0 - Leave this at 0 to let OBS automate this value.
-
CPU Usage: Varies - If you have a powerful computer, you can choose a slower speed to improve encode quality. The default isFast. Consider using that orVery Fast.
- The difference in quality is less noticeable than the divergence in CPU load, as is shown in this comparing video.
-
Profile: High - Recommended over Primary Profile.
-
Tune: None- Yous tin also choose Film, which is optimized for cameras and full general employ, but may not make a noticeable difference. Additionally, there isZerolatency, which may help with live broadcasts that have audience interaction, simply it volition as well negatively impact the quality.
back to table of contents
Adding Sources:
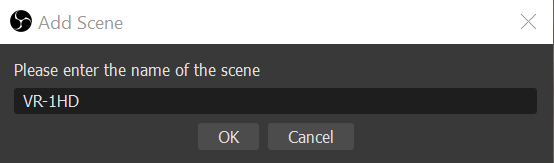
- First, create aScene. Click the"+"button in theScenesdepartment, and give it a proper noun.
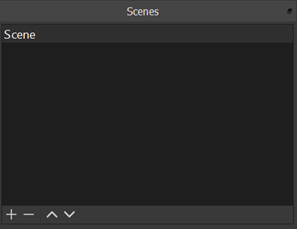
- Scenescontain your video, audio, and mediaSources. You can after create unlike combinations or configurations of Scenes, and switch between them.
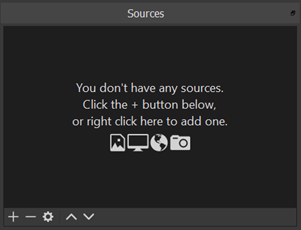
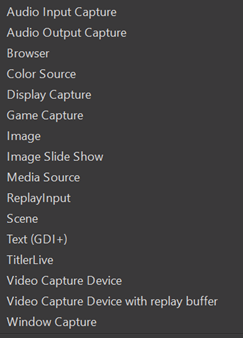
- Next, add Due south ources. Click the + button in the Sources section, and a list will appear.
-
If using MacOS, you need to create aVideo Capture Device start, followed by anAudio Input Capture, to meet and hear the output of your AV Mixer.
- If using Windows, you can either create separateSources, or combine the audio and video in a singleVideo Capture Device source; more than on that beneath.
-
This connection basically turns your VR Series Mixer into "One Big Webcam": the audio and video from the same hardware source is divided into separate software sources in OBS, VR Capture, or fifty-fifty when streaming directly to Facebook or YouTube via your web browser.
MacOS SOURCE SETUP
- Add aVideo Capture Device Source, give it a name, and a Backdrop window will appear.
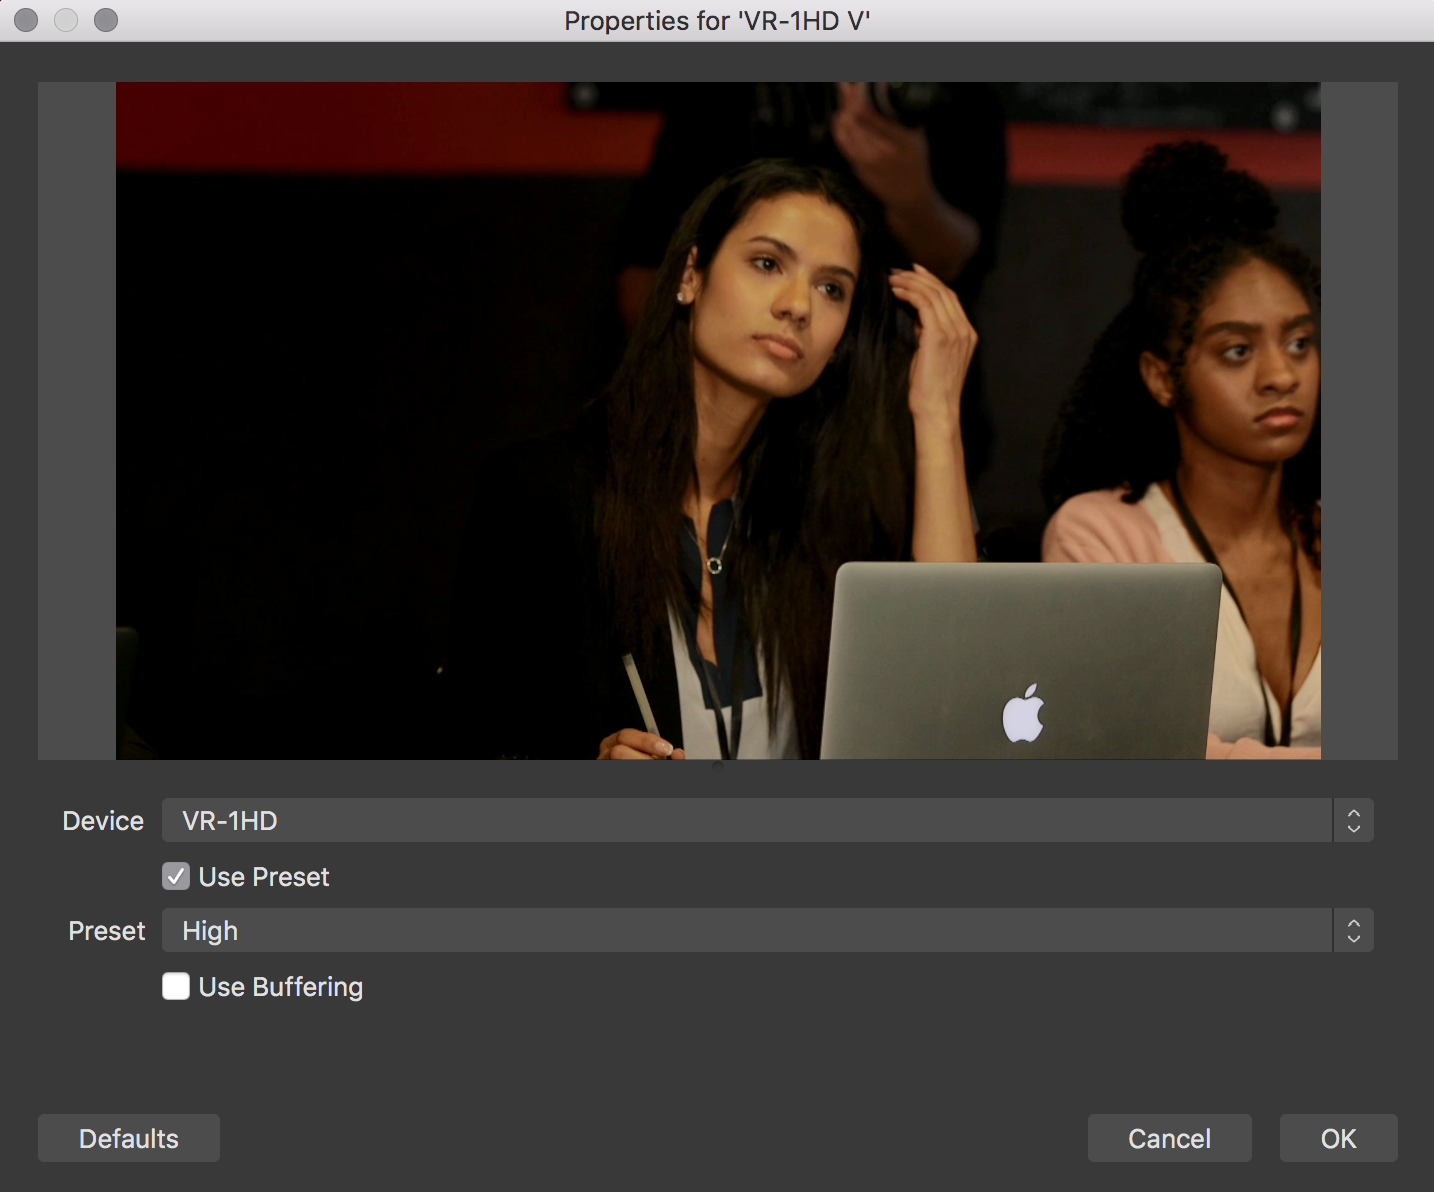
- Click on Device, and select your VR Serial Mixer from thedrop-downwardly list.
- You should come across a video preview within a few seconds.
- Next, change thePreset setting toHigh if working in 1080P, the default may be set to720P.
- Once configured, you tin can click OK.
- If you do non run into the video, make certain your VR Series Mixer is outputting video via HDMI.
- Leave the other settings at their defaults, yous tin access advanced settings past united nations-checking the Use Preset box, but information technology is not necessary for this guide.
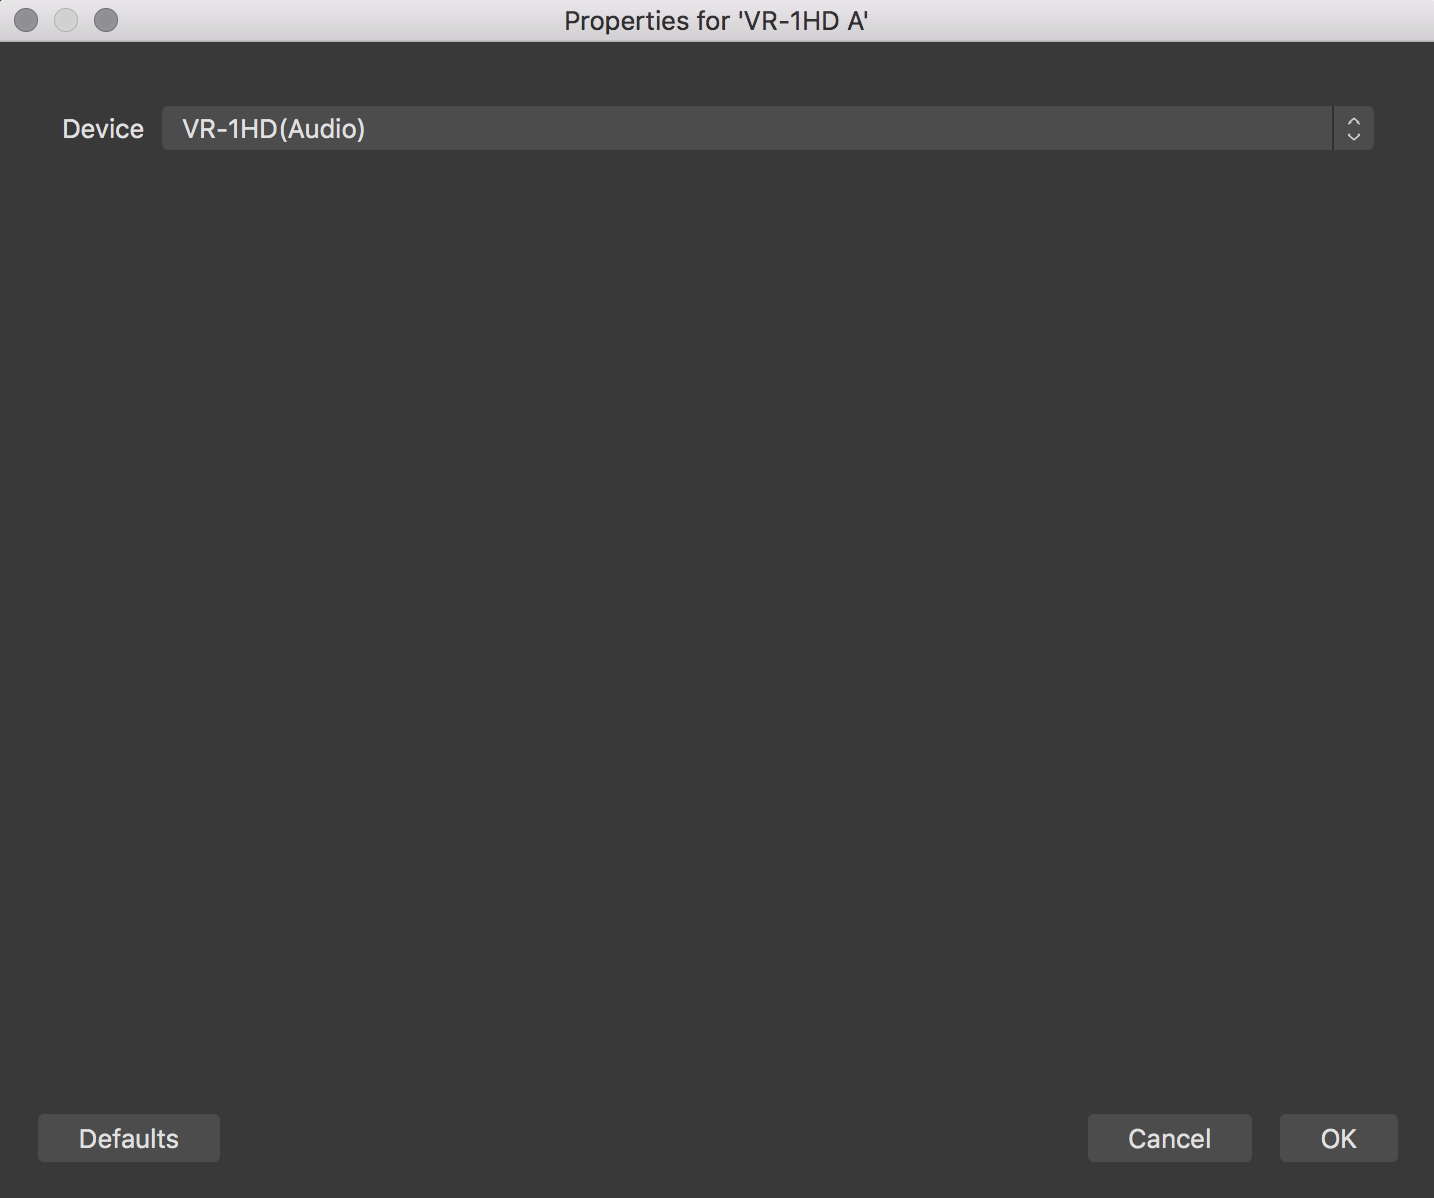
- Next, add anAudio Input Capture Source, give it a proper noun, and a Backdrop window will appear.
- Click on Device, and select your VR Series Mixer's Audio from thedriblet-down list, and click OK.
WINDOWS x SOURCE SETUP
- Add aVideo Capture Device Source, give it a name, and a Properties window will appear.
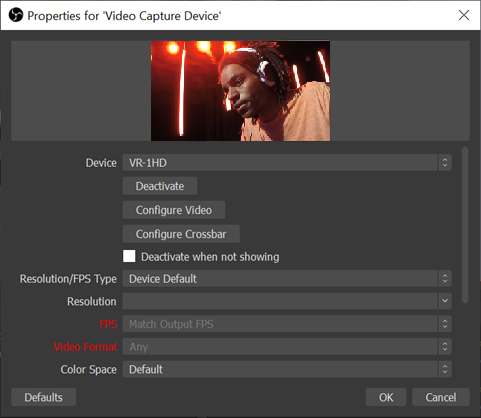
- Click on Device, and select your VR Series Mixer from thedriblet-down list.
- You should meet a video preview inside a few seconds.
- If you practise not see the video, make certain your VR Series Mixer is outputting video via HDMI.
-
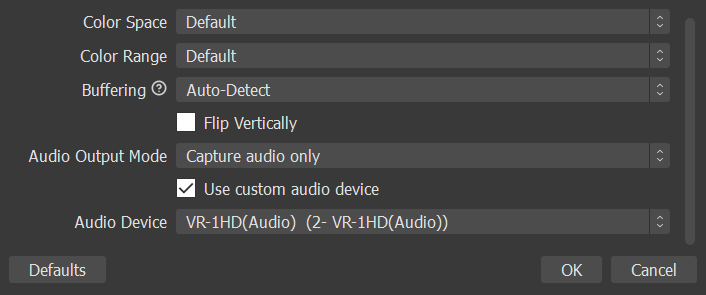
Leave the settings at their defaults, and scroll to the lesser.
- Check the "Utilise custom audio device" push, and confirm theSound Device is your VR Series Mixer.
- Once confirmed, clickOK.
- That concludes the separate MacOS and Win 10 instructions, the remaining sections cover both operating systems.
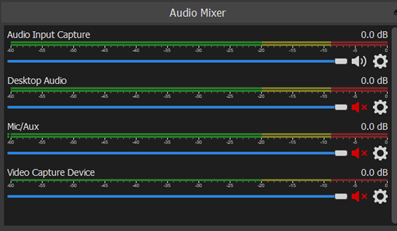
AUDIO MIXER SETUP
-
Next, setup the Sound Mixer.Mutethe channels that yous don't need past clicking on the whiteSpeakericon. It will alter into a scarletSpeaker.
-
In almost cases, you merely want yourAudio Input Capturesource un-muted, equally this is the sound from the AV Mixer.
-
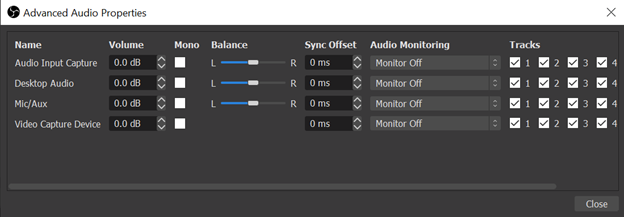
If you click on any of theGearicons in the Audio Mixer window, and selectAdvanced Sound Backdrop, it opens a window where you can add together audio delay and mix-down the Audio Input Capture source to mono, if needed.
-
Facebook now supports stereo sound, and then you no longer need to mixdown to mono.
-
-
You can add audio delay to synchronize with video by inbound a positive value in theSync Offset box for that channel.
-
You can also set the audio delay in your VR Series AV Mixer. Typically, you can add together 500 ms of filibuster to each input and output, for a total of 1000 ms.
-
When testing your stream, handclapping your hands in front end of a mic, and adjust theSync Offset accordingly. Start with 500 ms of delay, and see if that fixes the sync.
- It can be nearly impossible to measure this by eye, so you can import a recording into editing software, or use an app like Catchin' Sync, which tin tape a prune using your phone's high speed camera, and help you mensurate the sync start.
-
If you are recording in OBS, you can as well set which audio sources go to which Tracks. Note if y'all are only streaming, you can just stream one of the Tracks, so you can leave this setting alone.
-
This can be confusing. Tracks in OBS are stereo audio outputs that have one or more sound Sources mixed and routed to them.
-
-
back to table of contents
Add a Logo in OBS:
-
Y'all can easily add a still epitome and key it using OBS, like a logo or "corner bug", without tying up a video input or withal image slot on your AV Mixer.
-
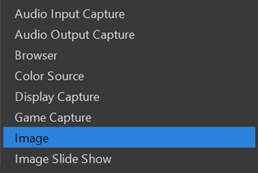
First, add together aSourcein OBS, and chooseImage.
-
In the window that pops up, scan for the image yous want to add, and clickOK.
-
Any source in OBS tin be dragged or resized on the canvass, including your main video. Y'all will see an outline around it, with nine anchor points.
-
One time you have the nugget placed on the canvass, left-click on information technology so it'south highlighted reddish, so correct-click on information technology and chooseFilters.
-
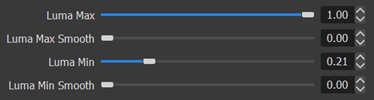
In the window that pops up, click the+push button and chooseLuma Keyfrom the listing (or Chroma if the background is a solid colour).
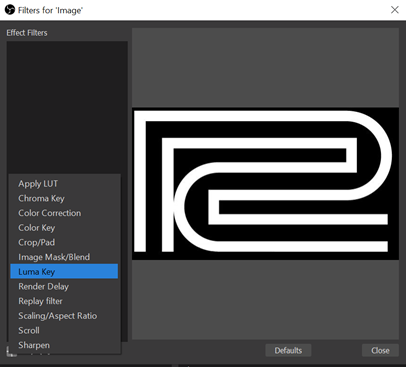
-
Adjust the Keyer settings until you have a clean key.
-
Now you have a logo overlay without tying up AV Mixer resource.
back to table of contents
RTMP Stream Settings:
- Go back into the OBSSettings, and this time, chooseStream.
- OBS simplifiesRTMPstreaming by providing presets that automatically point your stream to the correct Server URL for supported platforms.


-
Adjacent, open your web browser and go to the streaming service'due south Command Panel, re-create theStream Fundamental, and paste it into this field.
-
The next two sections walk you through setting upYouTube LiveandFacebook LiveforRTMP streaming.
-
Note that OBS supportsRTMPS, which is required by most streaming platforms, it is a version ofRTMP with better data security.
-
That said, do non share yourStream Key, it volition allow others to take over your streaming channel until you lot create a newStream Keyin the platform'south settings.
-
back to table of contents
Connect to Facebook:
- Go to the Facebook website, and click on theLive Video push button underneath the "What'south on your listen" text box.

-
This volition take yous to the Live Producer dashboard. If using a laptop with a webcam, you volition probably see yourself on the screen.
-
Click the down arrow push button below it or coil down until y'all see the Become Started options.

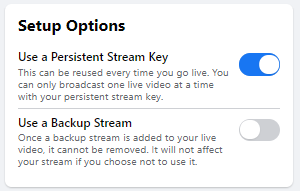
- In the Get Started department, click onUse Stream Primal.

- If y'all want to use the aforementioned stream key every time, check the choice"Use a persistent stream central", otherwise, it will modify for your next stream and not connect to OBS.
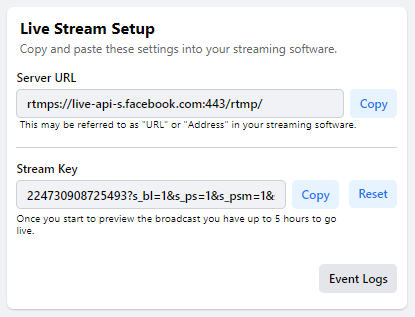
- You will now see the Live Stream Setup window, and tin copy your Stream Key to the clipboard, and paste it into OBS:
-
Normally, yous would chooseCameraif streaming directly to the browser using your AV Mixer, merely this guide is focused on RTMP streaming. For steps on streaming directly, please use this guide:
VR Series: How to Stream to Facebook Directly
- Ostend your OBSStream Settingsare set to Facebook Live, and paste the Stream Key in the box:

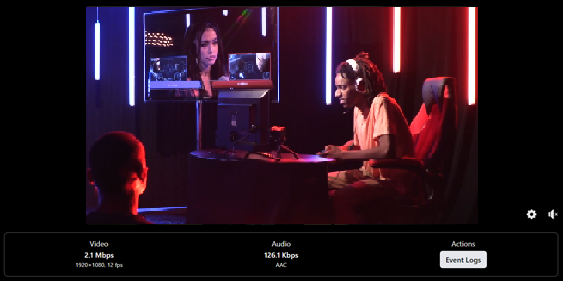
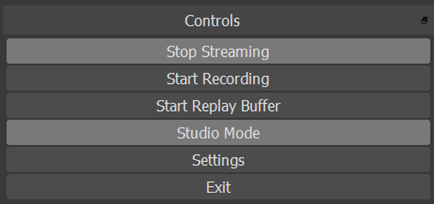
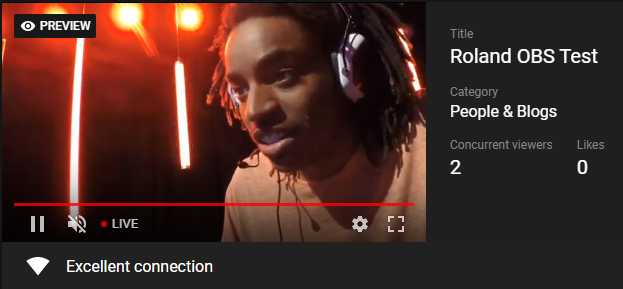
- And then, in the lower-right section of OBS, underControls, click onStart Streaming, and the Facebook interface should show a video preview within xxx seconds:

-
Retrieve, if your cyberspace upload speed is not fast enough, OBS will driblet video frames, and your stream volition skip a lot, and lose audio sync.
-
You can arrange the OBSFleck-Rate setting live, and so once yous offset streaming, you tin reduce the value, if needed. You volition detect the status bar in the lower-right corner of OBS adds data while streaming: Dropped Frames, a Green/Yellow/Red stream health icon, and the current combined audio and video bit-rate in Kbps.
-
- Coil dorsum up to come across your Video and Audio bit-rates below the preview video. If it appears paused, click on the video and it should play.
- When set up, click the Go Alive button in the bottom-left corner to beginning the stream. This will interruption your video again in the preview, so you will need to play it again.

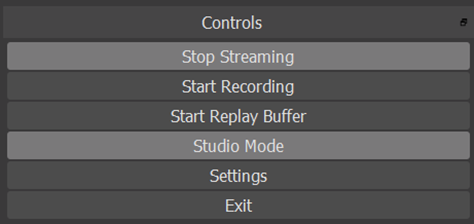
- When yous end the stream in Facebook, y'all need to separately end it in OBS likewise, by clicking the Stop Streaming push in the lower-correct corner.
back to table of contents
Connect to YouTube:
- In the elevation-right, click on the"+ Camera"icon, followed byGo Live.
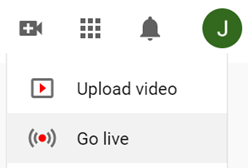
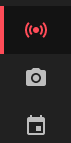
- Along the pinnacle left of the screen, click on the Stream icon:
- Normally, yous would cullWebcamif streaming directly to the browser using your AV Mixer, but this guide is focused on RTMP streaming. For steps on streaming direct, please utilize this guide:
VR Serial: How to Stream to YouTube Direct
-
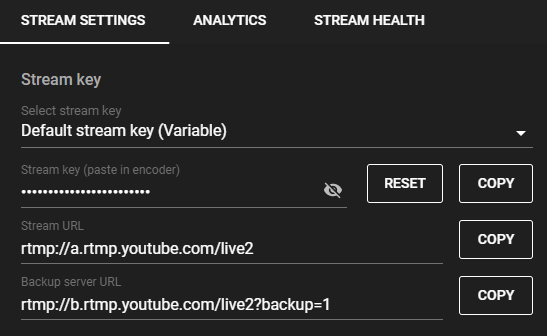
You will meet all of your settings grouped into sections. Make certain that theStream Settings tab is selected.
- In the YouTube setup interface, click theCopybutton for theStream Name/Key, and paste it in OBS in theStream Keyfield in thatStream Settings window:
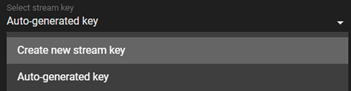
- You also have the pick to create custom stream keys if you programme to reuse the same i each time you stream.
- Ostend your OBSStream Settingsare set up to Facebook Alive, and paste the Stream Primal in the box:

- Note that the next time you create a stream, if youCreate From Previous, information technology volition re-apply the stream fundamental from that previous stream. If you want to reuse those settings only take a new stream key, clickCreate New Stream Keyin the interface.
- If y'all instead create aNew Streamwith new settings, it will generate a newStream Centralyou'll have to re-create and paste once again into OBS.
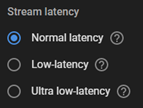
- If your stream interacts a lot with your audition, YouTube will permit you lot bring down the average latency, at the expense of video quality. One time yous set this and start streaming, it can't be changed.
- Then, in the lower-right section underControls, click onStart Streaming, and the YouTube interface should show a video preview within 30 seconds.
-
Remember, if your internet upload speed is non fast enough, OBS will drop video frames, and your stream will skip a lot, and lose audio sync.
-
You tin can adjust the OBSScrap-Charge per unit setting live, so once you start streaming, yous can reduce the value, if needed. You lot will discover the status bar in the lower-right corner of OBS adds data while streaming: Dropped Frames, a Dark-green/Yellow/Red stream health icon, and the current combined audio and video flake-rate in Kbps.
-
- Once you have the settings where you want them, click Go Live in the top-right corner, and your YouTube stream will showtime in a few seconds.

- When yous cease the stream in YouTube, y'all demand to separately end it in OBS as well, by clicking the Stop Streaming button in the lower-right corner.
dorsum to tabular array of contents
Connect to Restream.io:
-
Restream.iois a streaming distribution platform. You tin connect to information technology via OBS like you did with Facebook Live or YouTube Live, but Restream.io can multi-stream your content to both platforms at the same fourth dimension.
-
The free version may include a watermark over your video in the peak correct corner, depending on the platforms that you multi-stream to.
- Alternatives to Restream.io: Castr.io , Switchboard.alive , Loola.tv
-
-
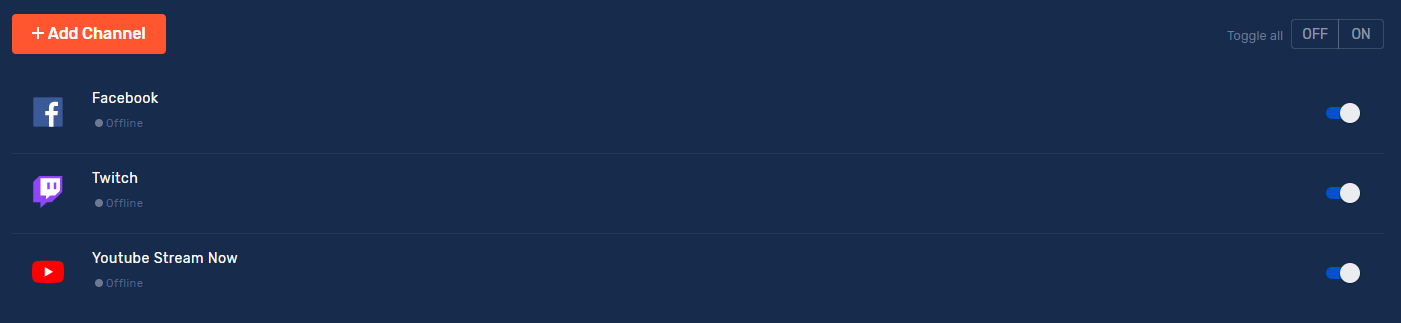
Before yous commencement streaming in OBS, you demand to add together aChannelin Restream.io for each platform you want to stream to.
-
In the Restream.io dashboard, click on the redAdd Channelpush button, choose a platform from the listing, and follow the on-screen instructions to link the business relationship to Restream.io.
-
You can enable and disable private channels for your multi-stream by using the toggle switches to the right of each channel.
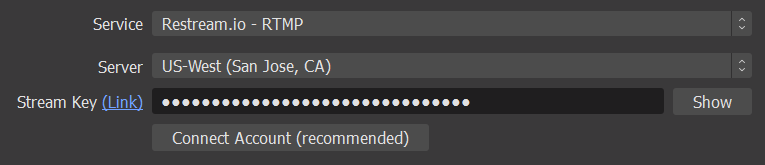
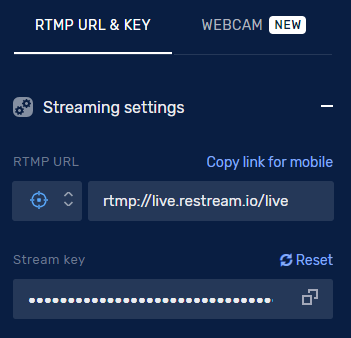
- To set your OBSStream SettingstoRestream.io, choose the server geographically closest to you, and then paste theStream Cardinalcopied from theRestream.io website's command console.
- Once you have everything configured and enabled, click the Start Streaming button in OBS, and it volition go on to push your RTMP stream to your enabled Restream.ioChannels.
back to tabular array of contents
More Data:
For more information on the Roland VR Series, OBS Studio, and Restream.io, besides as directly connecting to a streaming service as a webcam, please use the following links:
- Roland Pro A/Five - VR Series Comparison
- VR-1HD Manuals
- VR-4HD Manuals
- VR-50HD MK I Manuals
- VR-50HD MK II Manuals
- OBS Studio Aid Center
- Restream.io Help Centre
- VR-1HD: Troubleshooting USB Video and Audio Output
- VR-4HD: Troubleshooting USB Video and Audio Output
- VR-50HD: Troubleshooting USB Video and Audio Output [MK I & 2]
- VR Series: How to Stream to Facebook Directly
- VR Series: How to Stream to YouTube Directly
- VR Series: How to Stream to Zoom Directly
carterdaithis1970.blogspot.com
Source: https://www.roland.com/nl/support/knowledge_base/360036213831/
0 Response to "Run Streamlabs Frst Time Setup Again"
Post a Comment